17 KiB
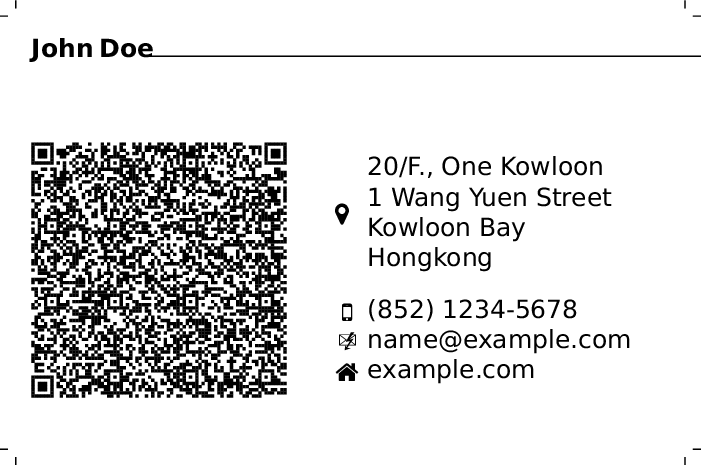
Businesscard with QR-Code
What happens, if you give your visiting card to someone? Either he manually types the text into his computer or mobilefone, or it will end up in a box and be forgotten. Nowadays data is required electronically, not on paper. Here is the solution: A visiting card with QR-Code that contains a full vcard, so that it can be scanned with an app on the mobilefone and therefore automatically imported into the electronic contacts. This also works well, when you are offline and bluetooth transfer fails. So here is the highly configurable businescard or visitingcards with full vcard as QR-Code, ready to send to online printers. You can specify the exact size of the paper and the content within the paper, inluding generation of crop marks.
Other available visitingcard templates, such as mschlenker distribute the cards on an A4 paper. But if you want a professional printer, such as onlineprinters, then you need to be able to generate a PDF with exactly one card, an exactly defined border and crop marks.
Features
- all information is in the QR-Code
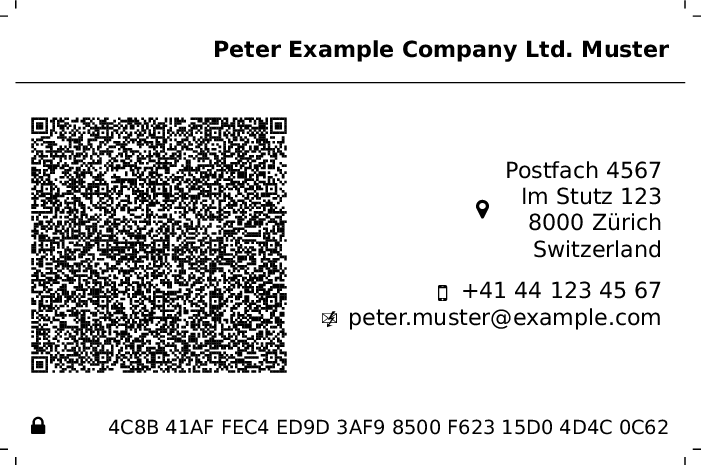
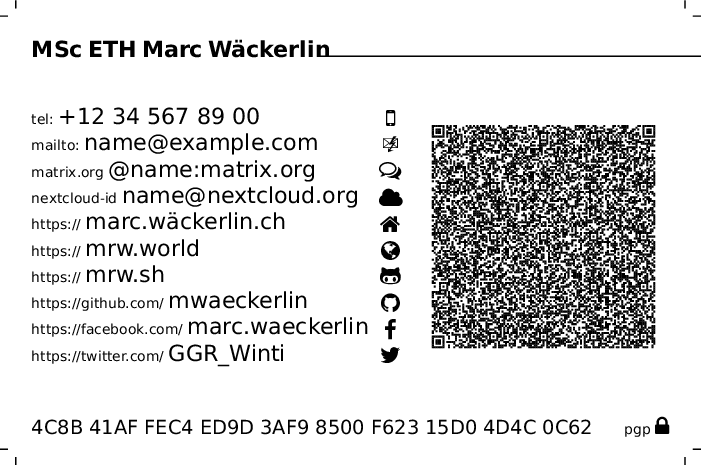
- full privacy control: input is optional, specify only what you need, you decide what information to share, e.g. I print three cards, with phone and address, without address and only with electronical contacts, no phone nor address
- optional icons, optional small hint texts
- several alignments
- freely defined size of paper and content
- supports honoric titles, full names, address with post office box and extended information
- supports telefone, email, jabber and matrix chat
- supports several urls for your hompages
- supports gitea, github, git
- supports facebook, twitter, google+, youtube, wikipedia
- supports pgp key url and fingerprint
- supports nextcloud federation id
Usage
Installation
Copy businesscard-qrcode/businesscard-qrcode.cls to your LaTeX class path. Simplest way for installation on Linux:
mkdir ~/texmf/tex/latex/businesscard-qrcode
cp businesscard-qrcode/businesscard-qrcode.cls ~/texmf/tex/latex/businesscard-qrcode/
ln -s ~/texmf/tex/latex ~/texmf/tex/xelatex
Compilation
Important: You must use xelatex for compilation, because xelatex properly supports UTF-8 (e.g. needed for german umlauts or chinese characters). The package inputenc messes up with package qrcode.
Note for iOS: vCard content inside the QR now uses CRLF line endings (per spec) to improve import robustness on iOS without changing the vCard version (still 4.0 by default). Also the QR error correction level can be configured.
Document Structure
\documentclass[<layout-options>]{businesscard-qrcode}

<data-definitions>

\begin{document}
	\drawcard
\end{document}
where <layout-options> and <data-definitions> are explained below.
Layout Options
Layout options are set as options to the \documentclass, e.g.:
\documentclass[textwidth=0.7,qrwidth=0.25,www,nofill,iconright,rightalign,hint,icon,textfirst]{businesscard-qrcode}
Available Options:
paperwidth=: width of the physical paper where the card is printed on (incl. border), default:89mmpaperheight=: height of the physical paper where the card is printed on (incl. border), default:59mmcontentwidth=: width of the card's content without the border that is cut, default:85mmcontentheight=: height of the card's content without the border that is cut, default:55mmfontsize=: any fontsize allowed inextarticle, that are8pt,9pt,10pt,11pt,12pt,14pt,17ptand20pt, default:8ptpadding=: padding within the card's content, default:2mmcutdist=: distance inmmwhere the cut marks are set, default:2cutlen=: length of the cut marks inmm, default:1textwidth=: relative width of the text block1means full width, soqrwidthplustextwidthshould be smaller than1the remainig space is left empty between the text and QR-Code, default:0.55(that's 55% of the available space)qrwidth=: relative width of the QR-Code1means full width, soqrwidthplustextwidthshould be smaller than1the remainig space is left empty between the text and QR-Code, default:0.40(that's 40% of the available space)lang=: language of the wikipedia page, will be prepended beforewikipedia.org, e.g.de.wikipedia.org, default:deaddressornoaddress: disable rendering of the address in text and QR-Code, default: addresshintornohint: show the little text hints, default:hinticonornoicon: show the icons, default:iconrightalignorleftalign: align text left or right, default:rightaligniconleftoriconright: show icon left or right of the text, default:iconleftfillornofill: fill empty space between icon and text, default:fillqrfirstortextfirst: switch position of QR-Code and text block, default:qrfirsthttpsorwww: should links in the hints be prefixed withhttps://orwww., default:httpscountryformat=: how to format the country in address. Values:auto(default: inline with mdash if <4 chars and city/zip exists),inline(always inline with mdash),below(always separate line)qreclevel=: QR error correction levelL(~7%),M(~15%),Q(~25%), orH(~30%), default:H. UseHwhen embedding logo in QR code.qrlogoscale=: logo size in QR code as fraction of QR width (1.0 = 100%), default:0.25(25% width). Recommended values: Level H: 0.25-0.3, Level Q: 0.2, Level M: 0.15, Level L: 0.1. Higher values may reduce scannability. Can be overridden locally with\qrlogo[scale=...]{file}.qrlogoborder=: transparent padding around logo in QR code as fraction of QR width (1.0 = 100%), default:0.02(2%). Adds space between logo and QR modules.logoheight=: logo height next to name with unit (e.g.,4em,6em), default:4emif company is set,2emotherwise. Can be overridden locally with\logo[height=...]{file}.bgscale=: background image scale factor (1.0 = 100% of card height), default:1.0. Use values like1.5or2.0for zoomed/cropped backgrounds. Only affects images, not colors. Can be overridden locally with\background[scale=...]{file}.bgopacity=: background image opacity/transparency (1.0 = 100% visible, 0.0 = invisible), default:1.0. Use lower values like0.2or0.3to fade the background so text remains readable. Only affects images, not colors. Can be overridden locally with\background[opacity=...]{file}.qrbgopacity=: QR code background opacity (1.0 = solid white, 0.0 = transparent), default:1.0. White background behind QR code ensures scannability over background images. Use0.0for no background or lower values like0.8for semi-transparent. Can be overridden locally with\qrlogo[opacity=...]{file}.
Data Definitions
Your data is entered with commands in the document, e.g.:
\email{name@example.com}
Important:: Spaces must be escaped by a backslash \ in all data definitions, if they should be kept in the QR-Code. This is a limitation of the qrcode-package- Without escaping \, spaces are show in the text block, but not in the QR-Code. You may make use of this feature, if you do not escape the spaces in \phone and \pgpfingerprint, but everywhere else. This way, phone number and pgp fingerprint are condensed in the QR-Code.
See this example_
\givennames{Juan\ Pablo}
\familynames{Martínez\ Escudero}
\company{Example\ Company\ Ltd.}
\street{Im\ Stutz\ 123}
\pobox{Postfach\ 4567}
\phone{+41 52 123 45 67}
\pgpurl{https://pgp.mit.edu/pks/lookup?op=get\&search=0xF62315D04D4C0C62}
Recognized Commands:
\type: eitherhomeorworkfor personal or business cards\givennames: your first name and eventual middle names\familynames: your family names\honoricprefix: honorix name prefixes, e.g. academic titles\honoricsuffix: honoric name suffixes\company: company name — displayed on a second line below the name\pobox: post office box\extaddr: address extension, e.g. name of a building or floor number\street: street and number of the address\city: name of the address location\region: region of the address\zip: zip code of the address\country: full name of country of the address in the language of the card (short codes likeCH,USA,Dare automatically placed inline with mdash before city/zip, longer names on separate line)\phone: your phone number, the phone is marked as mobile, so to be used for voice and text (SMS)\email: your email address\jabber: your jabber or xmpp chat address\matrixorg: your matrix chat addres, hint: use riot messenger for matrix\cloud: your nextcloud federation id — the url is prepended automatically\homepage: url to a web site with «home» icon — withouthttps://notwww(unless it is required), this is prepended automatically\world: url to a web site with «world» icon — withouthttps://notwww(unless it is required), this is prepended automatically\link: url to a web site with «link» icon — withouthttps://notwww(unless it is required), this is prepended automatically\wordpress: url to a web site with «wordpress» icon — withouthttps://notwww(unless it is required), this is prepended automatically\drupal: url to a web site with «» icon — withouthttps://notwww(unless it is required), this is prepended automatically\joomla: url to a web site with «joomla» icon — withouthttps://notwww(unless it is required), this is prepended automatically\wikipedia: if you or your company have a wikipedia entry, specify documentclass optionlangfor the language of you entry and use this definition for the name of your page — the url is prepended automatically\git: the url of your git repository — withouthttps://notwww(unless it is required), this is prepended automatically\gitea: the url of your gitea project page, you can use this tag also for other project management sites, such as gogs — withouthttps://notwww(unless it is required), this is prepended automatically\github: your account name on github — only the name of the account, the url is prepended automatically\facebook: your account name on facebook or the name of your page — only the name of the account or page, the url is prepended automatically\twitter: your account name on twitter — only the name of the account, the url is prepended automatically\youtube: your account name on youtube — only the name of the account, the url is prepended automatically\google: your account name on google+ — only the name of the account, the url is prepended automatically\pgpurl: the full url to your pgp public key (only added to the QR-Code, not shown in the text)\pgpfingerprint: the fingerprint of your pgp public key\logo[height=...]{file}: path to logo file (PNG, JPG, etc.) for display next to name. Optionalheightparameter (e.g.,height=6em) overrides globallogoheightoption.\qrlogo[scale=...,opacity=...]{file}: path to logo file for display in QR code center. Optional parameters:scale(fraction like0.3for 30% of QR width) overridesqrlogoscale,opacity(0.0-1.0) overridesqrbgopacity.\companylogo{content}: arbitrary content (e.g.,\includegraphics[width=3cm]{logo.png}) displayed instead of company text below name. Company text still appears in vCard.\background[scale=...,opacity=...]{file/color}: path to background image file or color name (e.g.,yellow!20,blue!10). If file exists, it's used as image; otherwise treated as color. Optional parameters:scale(factor like1.5) overridesbgscale,opacity(0.0-1.0) overridesbgopacity.
Print the Card
The card is designed for professional printing service, such as onlineprinters. Please check the card and the QR-Code well before you pay money for printing! Choose a format, default is 89mm×59mm with 2mm boder, so the card content is 85mm×55mm. But the card can be adapted to any other printing format. To print cards of size 10cm×5cm with 2mm cut, you specify, e.g.:
\documentclass[paperheight=5.4cm,paperwidth=10.4cm,
               contentheight=5cm,contentwidth=10cm,
               cutdist=2]
               {businesscard-qrcode}

Usage Example
Include the documentclass, define your data and add the document environment:
\documentclass{businesscard-qrcode}

\type{home}
\givennames{An}
\familynames{Example}
\street{Einbahnstrasse\ 84}
\city{Irgendwo}
\zip{1001}
\country{Switzerland}
\homepage{example.com}
\email{name@example.com}

\begin{document}
	\drawcard
\end{document}
Save it as file texstudio_d30266.tex and compile it to get texstudio_d30266.pdf:
xelatex -synctex=1 -interaction=nonstopmode texstudio_d30266.tex

See examples for more examples.
Logo (optional)
You can add an optional logo that appears next to the name or in the center of the QR code. The logo is dynamically scaled to match the name line height (when next to name) or to 25% of the QR code width (when in QR).
\logo{path/to/logo.png}
Logo Placement Options:
Default (logo next to name):
\documentclass{businesscard-qrcode}
\logo{logo.png}
Logo in QR code center:
\documentclass[logoinqr,qreclevel=H,qrlogoscale=0.25]{businesscard-qrcode}
\logo{logo.png}
Important: When using logoinqr=true:
- Always use
qreclevel=H(highest error correction ~30%) for reliable scanning - Test QR code scannability with multiple apps before printing
- Default
qrlogoscale=0.25(25% width = 6.25% area) is recommended for Level H - If scanning fails, reduce to
qrlogoscale=0.2orqrlogoscale=0.15 - PNG transparency is preserved - use images with transparent backgrounds for best results
Large logo next to name:
\documentclass[logoheight=6em]{businesscard-qrcode}
\logo{logo.png}
Background color:
\documentclass{businesscard-qrcode}
\background{yellow!20}
Background image:
\documentclass[bgscale=1.5,bgopacity=0.3,qrbgopacity=1.0]{businesscard-qrcode}
\background{photo.png}
Note: Use bgopacity to fade the background (e.g., 0.2 or 0.3) so text remains readable. The QR code has a white background by default (qrbgopacity=1.0) to ensure scannability.
Need More
If you are missing a feature or a configuration option, consult the project page. Just open a ticket and the author will care about it. Or extend it, it's lgpl.